Why Hire a Chimney Cleaner?
When hiring a chimney cleaner, you should choose one with years of experience. Knowing your home is safe and clean will give you peace of mind. Obtain a chimney brush and enough rods to run the flue’s entire length. Begin at the top of the chimney and, threading on a rod when necessary, scrub downwards.

Clean Chimney Sweep Charleston is essential for safe wood-burning fireplaces and wood stoves. The chimney channels combustion byproducts out of your home, but over time, these toxins accumulate inside creosote, a hard, black substance that can fuel a dangerous chimney fire. Regular chimney cleaning prevents this buildup and frees your home from smoke and soot.
When to clean your chimney depends on how often you burn fires and the type of wood you use, but it should be cleaned at least once a year. Chimney fires caused by creosote are much more serious than chimney fires caused by soot, which makes it especially important to follow a regular cleaning schedule.
There are several ways to clean your chimney, but the most effective is hiring a professional sweep for a thorough cleaning. Professionals will use tools and equipment that prevent dangerous and costly mistakes, such as a specialized video camera to inspect your flue for blockages or other structural problems. They also have the expertise to safely use power tools and climb ladders without damaging your roof or causing a collapsed chimney.
If you prefer to do it yourself, prepare the area by covering the floor and furniture with drop cloths or plastic tarps. Put on a dust mask, safety goggles, and sturdy ladders. Before starting, remove the chimney cap and close the fireplace doors. Next, purchase a chimney brush sized and shaped to fit your flue and enough extension rods to run the flue’s length (rods come in 4-, 5- and 6-foot lengths).
Work from above; start by threading the first rod onto the chimney brush and inserting it into it. Scrub the chimney by letting the meeting slowly descend and adding additional rods when necessary. Continue scrubbing until the brush reaches a stopping point, usually the smoke shelf (a turn in the chimney above the fireplace).
After removing the chimney brush, screw the next rod to the chimney brush and repeat the process. Eventually, you’ll reach the bottom of the flue, where you’ll need to switch to a smaller meeting and begin scrubbing at the firebox opening. Once the chimney is clean, vacuum up any loose creosote and soot using a shop vacuum.
Before a chimney sweep arrives, clear the area around your fireplace and mantel of any furniture or items. Place a cloth or plastic over anything you don’t want soot to fall on. If you’re concerned about flammable objects, such as rugs, cover them in old blankets. Also, be sure to clear a minimum of 3 feet between the fireplace and any combustible materials.
During the cleaning process, your chimney sweep will use brushes and scrapers to remove soot, creosote, animal nests, and other debris from the inside of your chimney. The sweeper will also clean the smoke chamber damper, firebox, lining, and flue pipe. After they are finished, the chimney sweep will vacuum the mess and brush away any remaining creosote before leaving your home.
Dirty chimneys are the cause of many house fires each year. These fires are usually caused by a flammable creosote buildup, the residue from burning wood and other combustibles. A chimney that is not cleaned regularly may contain a dangerous layer of this thick, black material that can catch fire and ignite nearby wood framing and combustible insulation. A chimney fire can spread quickly and destroy your entire home.
In addition to preventing chimney fires, maintaining your chimney will help reduce energy costs. According to the National Fire Protection Association, a dirty chimney can reduce heat transfer efficiency by up to 50 percent. Having your chimney regularly inspected and cleaned by a certified chimney sweep will improve your chimney’s performance and reduce heating bills.
The lingering odors in your home could indicate a problem with the chimney, such as an animal nest or creosote blockage. These problems should be addressed as soon as possible to avoid expensive chimney repairs or damage to your home.
Chimney sweeps use a variety of tools to help them perform their job. These include brushes to scrub away soot and creosote, power vacuums to remove debris, and specialized equipment for analyzing the interior of chimneys. A chimney sweep can also install a chimney cap and spark arrestor to prevent fires in the fireplace and protect the home. Additionally, they may need to install a chimney liner, which keeps moisture and other contaminants from damaging the inside of the chimney.
The most basic tool a chimney sweep uses is the chimney brush. It looks like a large bottle brush with metal bristles around the top. Chimney sweeps attach these to extension rods that are sized and shaped to fit the flue and are then used to clean the chimney. They also use a hose with a filtered vacuum system to keep the air in the client’s house clean during the process.
In addition to the hose and a rotary chimney sweep, some professionals will also bring in a sifter or scraper. These are used to remove tar-like creosote that has hardened into the dangerous stages of creosote glaze.
These are more difficult to remove than the normal stages of creosote, which are easily brushed away. A sifter or scraper helps break up these creosote deposits and makes them easier to remove with the brush. Chimney sweeps also need equipment such as a ladder and an extension ladder for working high in the air. They will also need a safety harness and a pair of work gloves to protect their hands from falling creosote pieces.
Before chimney sweeps arrive home, they should prepare the area by moving furniture away from the fireplace and covering it with plastic or a drop cloth. They should also place a tarp over the roof to protect it from debris and moisture. They should also put down a protective mask to protect themselves from sand, dust, and other chemicals that might be present in the creosote.
A rotary chimney sweep tool is an alternative to a ladder or climbing on the home’s roof. It moves the chimney cleaner in a circular motion, which is more efficient than sweeping by hand. The rotary chimney sweep can remove more creosote quickly and is safer for the technician.
A fireplace produces a lot of smoke and fumes as it burns. As these materials rise through the chimney, they condense on the inside walls and become creosote. It is a dangerous, dark, tar-like byproduct of wood burning that won’t go away. It accumulates rapidly, and large creosote deposits can cause serious problems in your flue and chimney. These buildups prevent toxic gases, including carbon monoxide, from escaping your home. They can also cause chimney fires that could damage the chimney, fireplace, and mantle.
Having your chimney and flue cleaned regularly is important, preferably before each wood-burning season begins. It helps to minimize creosote buildup, which can be dangerous for your family’s health and the structure of your chimney. Creosote can appear in various forms, including a cloud of black powdery dust or flakes, crusty and flaky, drippy and sticky like tar, or shiny and hardened to the surface. Creosote can clog your flue, so combustion gases will not be released from your fireplace or wood stove. These gases can include carbon monoxide, a colorless, odorless, tasteless, and deadly poisonous gas.
In addition to blocking your chimney, a creosote deposit can block the opening of your flue, which prevents wood ash and other debris from falling back into your firebox or onto the floor. If you notice a creosote buildup, have your chimney inspected by a professional as soon as possible.
Chimney sweeps are familiar with the different stages of creosote buildup and can help you prevent it from getting out of hand. Stage 1 or first-degree creosote buildup looks like soot and can be removed easily with a chimney brush during regular cleanings. Stage 2 or second-degree creosote buildup is more difficult to remove and appears like black tar-like flakes. It is a much more serious condition that requires more specialized tools.
If you don’t have your chimney swept regularly, it can progress to the third and most serious stage of creosote accumulation. It is a thick, dark, and tar-like substance that simple brushing can’t remove. It is a very dangerous condition that causes chimney fires, which can destroy the entire structure of your fireplace and chimney. If you suspect a thick, hazardous creosote deposit in your chimney, contact a chimney sweep immediately for an inspection and sweeping.
The Importance of Proper Dock Reconstruction
Docks are exposed to water, sun, wind, and changing temperatures and can deteriorate over time. If you notice excessive rot or rust, it’s important to make repairs right away. Visit https://dockbuildingcharleston.com/ for professional help.

Residential dock reconstruction may require a general permit or COP depending on the construction project and its impact on coastal resources.
Wood that constantly comes in contact with water will eventually deteriorate, and docks are no exception. If not addressed quickly, the problem can result in serious structural issues. This is why regular inspections are so important. During these inspections, you should be on the lookout for loose boards or nails, rotting areas, and any cracks or other damage that may need to be repaired.
The most common issue that can arise from this exposure is wood rot, which occurs when fungus grows in the wood and starts to eat away at it. It is not uncommon for this to start at one spot and spread throughout the entire structure.
If caught in time, rot can be relatively easy to repair with new lumber. However, if it is not, it will continue to spread and will eventually compromise the integrity of your entire dock. The best way to prevent this is by using premium kiln-dried wood and keeping it properly sealed.
Another common issue that needs to be addressed is rust. It is possible for the metal fasteners used in your dock to rust from prolonged moisture exposure, and this can also weaken the structure. Fortunately, rust can usually be repaired by simply removing the old rusted nails and replacing them with new ones.
It is also a good idea to clean your dock regularly. This will help to remove any dirt or debris that has built up over time. You can use a stiff-bristled brush or even a pressure washer, though you should always be careful to avoid damaging the surface of your dock. After scrubbing your dock, you should rinse it thoroughly to ensure that all cleaning solution and loosened debris is removed.
Warped Boards
A dock that’s exposed to the elements 24/7 is bound to age and degrade. Depending on the material and location, a dock can develop various problems such as warping, rusting, or discoloration. Whether the problem is small or widespread, it’s important to identify and address dock issues quickly to prevent further damage and potential safety hazards.
For example, one or two deck boards that have become warped can be easily fixed by a bar clamp and some wood filler, but if the entire dock has a warped surface, it may be time to replace it. This could also mean replacing the entire foundation, a costly repair that can be avoided by addressing the issue promptly.
While a dock’s skeleton is generally sturdy, a damaged frame can lead to structural instability, which poses a serious safety risk. Homeowners typically pay $150 to $500 to fix dock frames, which can include welding or patching damaged sections.
It’s also common for a dock to experience issues with its decking. Wooden decks made from cedar or redwood are susceptible to mildew, rot, and water damage. While a regular cleaning can help keep these issues at bay, these materials do require periodic care and maintenance to last as long as possible.
Composite and other synthetic decking is an excellent choice for a dock because it’s moisture-resistant and easy to clean. These materials also don’t need the frequent staining that many wooden decks do.
Roll-in or lift-up docks, which are usually made from aluminum, are great options for people with limited storage space or who want to be able to roll their boat in and out of the water for winter protection. However, these kinds of docks are more likely to be damaged by rust and general wear and tear than larger, permanent docks.
Rotten Wood
Wooden docks are constantly exposed to the elements. It’s inevitable that the wood will eventually rot, even with proper maintenance. A little rot isn’t always a problem, but if it affects a large area of your dock it can be dangerous and should be repaired immediately.
You can typically spot rotten wood by its dark coloring. It will also be soft and crumbly. In some cases, you may see fungal growth around the rotted areas.
It is possible to treat rotted wood by using a wooden hardener, but it’s often more cost-effective and safer to simply replace the entire board. Once the rotted portion is removed, you can install a new plank that’s resistant to fungus.
While a lot of the material used in docks is pre-treated, you should still regularly inspect your dock for rot and rust. It’s important to remember that if the rot or rust is on a load-bearing support, your dock may need to be replaced.
A good way to prevent rot is to use a wood hardener that’s designed to withstand wet conditions. It’s best to apply the hardener using a brush, so you can get into the crevices and pores of the wood. The hardener should soak into the rotting wood, and once it’s dry, you should be able to scrub away any excess with a stiff brush. A good hose sprayer can be used to rinse off the wood after application, removing any cleaning solution and loosened dirt. This is an important step in dock reconstruction as it ensures that your dock will be protected from moisture and fungus. It can take a while for the wood to completely cure, however.
Metal Fastenings
When it comes to constructing and repairing docks, marine fasteners are an essential part of the process. The corrosive nature of the environment in which a dock is constructed and maintained often demands use of specialized fasteners that can withstand the harsh elements. Stainless steel marine fasteners are often used due to their corrosion resistance and strength.
However, when using stainless steel screws in dock construction it is important that contractors follow the best practices for working with them. The most important practice involves the pairing of stainless screws with other metals that are also made from a non-corrosive metal. This helps to prevent galvanic corrosion which can occur when dissimilar metals make contact with each other.
Stainless steel screws are ideal for dock construction due to their ability to resist corrosion in any type of environment. They are also a great choice for the dock pilings of many types of docks, as they provide an excellent connection between the concrete and the wood. However, constructing dock pilings from steel is challenging because of the difficulty in getting access to the actual connections that are needed for structural safety and integrity. Blind bolts, which offer one-sided installation into the steel that is being used, can provide a solution for this issue by making it possible to construct strong and secure docks.
Another common marine fastener that is used for dock construction is what is called a carriage bolt. These fasteners have a shallow dome-shaped head with a square neck directly underneath. They can be inserted into a round hole in metal or into the square head of most wood fasteners to make them self-locking. They are a great choice for applications involving metal to wood construction and can be used with a flat washer and hex nut (sold separately). Portland Bolt manufactures both stainless steel and galvanized carriage bolts in Grade 2 steel hot-dipped in zinc and are the least expensive metal fasteners suitable for the corrosive environment in which most marinas and other docks are located.
Foundation Deterioration
The most crucial aspect of any dock is the foundation that it sits on. Damage to this is a sure sign that total dock replacement will be necessary, as it is what holds the whole structure up. Any cracking or bending in the foundation is dangerous and needs to be addressed immediately. If the foundation is compromised, the entire dock structure can come tumbling down at the slightest touch of water.
Foundations are essential in any marine project, and docks are no different. The pilings that support the dock must be inspected often to make sure they are still intact. If the pilings are unprotected, they can be a breeding ground for wood boring worms that can destroy them in an instant. This is why it’s important to choose a company that offers piling protection as part of their dock construction services.
If the pilings are protected with piling caps, then they can withstand even the harshest weather conditions. This is one of the best ways to keep your dock from becoming a safety hazard for family and friends.
Once the safety hazards are taken care of, the rebuilding process can begin. Getting the job done right requires careful planning and attention to detail. A quality contractor will also have a staff that is dedicated to the project, highly skilled labor whose pay is commiserate with their experience, manpower to conduct supervision and inspections, and a team of professionals who know what they’re doing when it comes to marine projects. This is why it’s so important to take the time to meet with a contractor and find out more about what they have to offer before choosing them for your next dock project.
Siding Repair – Why It’s Important to Have Your Siding Repaired
Siding is a crucial part of your home, protecting it from the elements. It also adds to your home’s curb appeal and design.
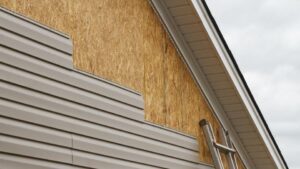
Keeping your siding in good repair is essential to your home’s longevity. Small cosmetic repairs are relatively easy to do yourself and can save you money. However, if you need some help from professionals, contact Charleston Advanced Siding Repair now!
Cracks in siding are not only unsightly, they can also allow moisture to seep into the home and cause serious damage. If the cracks are large enough, water can cause wood to expand and contract, eventually causing rot. Smaller cracks can be repaired using a waterproof caulk or wood filler, which should be colored to match the surrounding vinyl.
If the cracks are too large to repair with caulk, it’s best to replace the section of vinyl that contains them. This is a more time-consuming, but permanent, repair than simply filling the hole with caulk. To remove the vinyl, start by carefully removing any nails or screws that secure it to the house.
Next, remove the old vinyl with a utility knife or tin snips. Be sure to wear a pair of work gloves and safety glasses as working with these types of tools can be hazardous if the proper precautions are not taken.
After removing the damaged vinyl, clean the area with soap and water to ensure that it is free of dirt and debris that may interfere with the adhesion of the caulk. Next, cut a piece of scrap vinyl that is slightly larger than the hole or cracked section. If possible, cut the edge of the scrap to match the curved edges of the broken vinyl.
If you are using a colored caulk to repair the cracks, apply it first over a bead of white caulk that has been applied to the back of the patch. This will help the color to blend in more smoothly. Once the patch has been pressed into place, use a caulk smoother to create a nice and even finish.
Once the caulk has had a chance to cure, you can paint it to match the surrounding vinyl. Be sure to use an alkyd oil-based primer, which will protect the new caulk from UV rays that can cause it to yellow over time. Then, apply a couple coats of your chosen paint and allow it to dry completely before reinstalling the siding panel that was removed.
Holes
Holes in your home’s siding are a serious problem that shouldn’t be ignored. Even the smallest holes in your siding allow for insects and moisture to get underneath. This can cause wood rot and other problems with the framing of your home. In some cases, the rotting can even make it into your walls and ceiling. If this happens, it’s important to call a professional and have the area repaired as soon as possible.
Often, small holes in your siding are caused by pests chewing away at the surface. Regardless of the cause, holes are a sign that you need to have your siding replaced. If they aren’t fixed right away, the damage can spread quickly and lead to more expensive repair costs down the line.
The easiest way to repair a hole in your vinyl siding is to apply some color-matched caulk. However, this can be difficult if your siding is an uncommon color. If you choose to use caulk, it is a good idea to clean the surrounding area before applying it. After the caulk dries, it is a good idea to wipe off any excess and then touch up the spot with matching paint.
Another easy way to repair a small hole in your vinyl siding is to use a fiberglass patch kit. These kits can be purchased at any home improvement store and usually come with instructions that should be followed closely. If you decide to use a fiberglass kit, it is recommended that you have some foil tape handy as well. This will help you ensure that the seams are completely watertight.
If the hole or crack in your vinyl siding is too big for caulking or using a patch kit, it may be necessary to replace the entire section of your siding. Having a professional inspect the situation and provide recommendations will be helpful. Getting the repairs made as soon as possible will help to protect your home’s value, curb appeal, and overall health. In the end, it will also help to save you money. When you do choose to hire a professional, make sure that they have experience and are certified by a reputable organization like the Better Business Bureau.
Warping
Siding that buckles or droops can cause moisture and structural damage to your home. This is especially true for vinyl siding, which can melt and warp from the heat of the sun. If left unattended, this problem can lead to rot and other serious issues that threaten your family’s safety and the integrity of your home. If you notice any signs of warping, it’s important to call a reputable siding contractor.
There are many reasons why siding becomes warped, but one of the most common is that it was nailed too tightly when it was installed. Because vinyl expands and contracts with the temperature, it needs room to move. If it is nailed too tightly, it will begin to warp and bulge. Another reason why siding becomes warped is that the weather causes it to change shape. It is best to keep a close eye on your siding, especially after severe storms and summer heat.
Even if your siding isn’t buckling, it should be inspected for cracks, holes, and general wear and tear. Leaving damaged areas untreated will allow insects to invade your home, and could also lead to wood rot. Additionally, loose or warped siding may blow off during a storm, posing a risk to your family’s safety.
The good news is that if you catch the issue early, you can avoid costly repairs later on. The first step is to find out what caused the warping. If the problem occurred when your home was being built, talk to the installer to see what can be done. It’s also a good idea to regularly inspect your home for damage, twice a year or after severe storms.
Rot
Wood rot is a big issue that can lead to structural damage and soggy insulation. This type of rot is typically caused by an aggressive fungus that feeds on the moisture within wood. It’s usually found in lumber that has been cured and dried for use as siding, although rot can occur with other types of materials used for home siding such as masonite and oriented strand board.
Rot is not something that is easy to repair. A lot of work is involved, and it may be necessary to remove the entire section of rotted siding and replace it with new material. This is a project that requires the assistance of a professional contractor. During the removal process, bracing may need to be installed to make sure that the wall remains secure. The contractor will also remove any siding or other materials that are damaged by the rot, and treat the area with a fungicide to protect the new wood that will be installed.
It’s important to stay up to date with routine home maintenance in order to avoid rot problems. It’s recommended that homeowners perform an inspection of the exterior of their homes twice a year and after severe storms. This will allow them to catch any potential issues before they become a serious problem. It’s also helpful to keep gutters in good condition, as leaking gutters will leak water directly onto the walls of the house.
If the rot is caught quickly, there are products available that can be used to help restore it. In some cases, the rotting will be confined to one or two sections of the siding. In these cases, the professional will likely replace just those areas of rotted siding and not the whole piece of wood that is affected.
If the rot is more widespread, the siding will likely need to be replaced completely. Replacing a whole section of siding can be expensive, so it’s important to evaluate the damage carefully and decide on the best course of action. It is generally a good idea to hire a professional contractor to ensure that the job is done correctly and in compliance with all local building codes.